Install Calico on non-cluster hosts and VMs
Big picture
Secure hosts and virtual machines (VMs) running outside of Kubernetes by installing Calico Enterprise.
Value
Calico Enterprise can also be used to protect hosts and VMs running outside of a Kubernetes cluster. In many cases, these are applications and workloads that cannot be easily containerized. Calico Enterprise lets you protect and gain visibility into these non-cluster hosts and use the same robust Calico network policy that you use for pods.
Concepts
Non-cluster hosts and host endpoints
A non-cluster host or VM is a computer that is running an application that is not part of a Kubernetes cluster. Calico Enterprise enables you to protect these hosts and VMs using the same Calico network policy that you use for workloads running inside a Kubernetes cluster. It also generates flow logs that provide visibility into the communication that host or VM is having with other endpoints in your environment.
In the following diagram, a Kubernetes cluster is running Calico Enterprise with networking (for pod-to-pod communication) and network policy; the non-cluster host uses Calico network policy for host protection and to generate flow logs for observability.
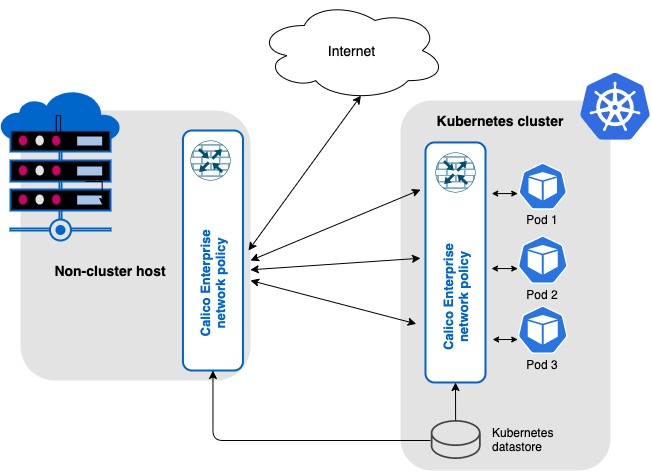
For non-cluster hosts and VMs, you can secure host interfaces using host endpoints. Host endpoints can have labels that work the same as labels on pods/workload endpoints in Kubernetes. The advantage is that you can write network policy rules to apply to both workload endpoints and host endpoints using label selectors; where each selector can refer to the either type (or be a mix of the two). For example, you can easily write a global policy that applies to every host, VM, or pod that is running Calico.
To learn how to restrict traffic to/from hosts and VMs using Calico network policy, see Protect hosts and VMs.
Before you begin
Required
-
Kubernetes API datastore is up and running and is accessible from the host
If Calico Enterprise is installed on a cluster, you already have a datastore.
-
Non-cluster host or VM meets Calico Enterprise system requirements
Ensure that your node OS includes the
ipsetandconntrackkernel dependencies.
How to
Set up your Kubernetes cluster to work with a non-cluster host or VM
-
Create a
NonClusterHostcustom resource.This resource enables the cluster-side ingestion endpoint to receive logs from non-cluster hosts. Additionally, it provides a dedicated Typha deployment for managing communication between the non-cluster host agent and Typha.
Field Description Accepted Values Schema endpoint Required. Location of the log ingestion point for non-cluster hosts. Any HTTPS URL with a domain name and a port number string typhaEndpoint Required. Location of the Typha endpoint for non-cluster host agent and Typha communication. Any IP address or domain name with a port number string kubectl create -f - <<EOF
apiVersion: operator.tigera.io/v1
kind: NonClusterHost
metadata:
name: tigera-secure
spec:
endpoint: <https://domain-or-ip-address:port>
typhaEndpoint: <domain-or-ip-address:port>
EOFWait until the Tigera Manager and non-cluster Typha deployments reach the Available status before proceeding to the next step.
-
Obtain the token for
tigera-noncluster-hostservice account.kubectl get secret -n calico-system tigera-noncluster-host -o jsonpath='{.data.token}' | base64 --decode -
Create a
kubeconfigfile for your non-cluster host or VM similar to the following:apiVersion: v1
kind: Config
current-context: noncluster-hosts
preferences: {}
clusters:
- cluster:
certificate-authority-data: <certificate-authority-data>
server: <server>
name: noncluster-hosts
contexts:
- context:
cluster: noncluster-hosts
user: tigera-noncluster-host
name: noncluster-hosts
users:
- name: tigera-noncluster-host
user:
token: <token>Replace the following:
- Cluster:
<server>: The URL of the Kubernetes API server.<certificate-authority-data>: Base64 encoded CA certificate to verify the Kubernetes API server's certificate.
- User:
<token>: A bearer token associated with thetigera-noncluster-hostservice account obtained in the previous step.
- Cluster:
-
Create a
HostEndpointresource for each non-cluster host or VM. ThenodeandexpectedIPsfields are required to match the hostname and the expected interface IP addresses.
Set up your non-cluster host or VM
-
Configure the Calico Enterprise repository.
curl -sfL https://downloads.tigera.io/ee/rpms/v3.21/calico_enterprise.repo -o /etc/yum.repos.d/calico-enterprise.repoOnly Red Hat Enterprise Linux 8 and 9 x86-64 operating systems are supported in this version of Calico Enterprise.
-
Install Calico node and fluent-bit log forwarder packages.
-
Use
dnfto install thecalico-nodeandcalico-fluent-bitpackages:dnf install calico-node calico-fluent-bit
-
-
Copy the kubeconfig created in cluster setup step 3 to host folder
/etc/calico/kubeconfigand change ownership tocalico:calico. -
Start Calico node and log forwarder.
systemctl enable --now calico-node.service
systemctl enable --now calico-fluent-bit.service
You can configure the Calico node by tuning the environment variables defined in the
/etc/calico/calico-node/calico-node.envfile. For more information, see the Felix configuration reference.
Configure hosts to communicate with your Kubernetes cluster
You must ensure that the non-cluster hosts or VMs can communicate with your Kubernetes cluster. If you are using an ingress controller or an external load balancer, ensure it is configured to allow TCP Layer 4 passthrough. This is required for non-cluster host agent to establish a mutual TLS (mTLS) connection to the cluster via the typhaEndpoint endpoint.
Below are some vendor-specific considerations:
AWS
- The node must reside in the same VPC as the nodes in your Kubernetes cluster, and utilize the AWS VPC CNI plugin (the default for Amazon EKS).
- Ensure that the Kubernetes cluster's security group permits inbound traffic from the host. You may need to add a rule allowing traffic from the hosts or VMs.
- For successful communication with an EKS cluster, the appropriate IAM roles must be configured.
- The host or VM must also be authenticated to access the cluster using tools such as aws-iam-authenticator and the AWS CLI
GKE
- To enable communication with your Kubernetes cluster from a non-cluster host, the host must be directly reachable or routable. This configuration is not enabled by default when using GKE’s VPC-native network routing.